Table of Contents
- สรุปสั้นๆ สำหรับคนรีบ (TL;DR)
- ทำไม API Security ถึงสำคัญกว่าที่คิด?
- 1. Authentication ง่ายกว่าที่คิด…ที่จะทำผิด 🔐
- 2. Authorization คือจุดที่ระบบพังจริงๆ 🚪
- 3. Input Validation: อย่าเชื่ออะไรทั้งนั้น 🛡️
- 4. Rate Limiting: ปราการด่านแรก ⏱️
- 5. Error Handling: อย่า Leak ข้อมูลออกไป 🤫
- 6. Case Study: API ที่เกือบทำให้ Startup ล่ม 💥
- ✅ API Security Checklist — Copy ไปใช้ได้เลย
- สรุป: Security คือ Practice ไม่ใช่ Feature
- ❓ FAQ — คำถามที่พบบ่อย
- 🎯 Key Takeaways
- 🌐 English Summary: Hard-Earned Lessons in API Security
[!IMPORTANT] > Intent: This article provides a technical post-mortem of real-world API security breaches. It targets backend developers and CTOs, offering a security-first development framework to prevent high-cost vulnerabilities in Authentication, Authorization, and Rate Limiting.
สรุปสั้นๆ สำหรับคนรีบ (TL;DR)
บทความนี้รวบรวม 6 บทเรียน API Security จากสนามจริง พร้อม Code ตัวอย่างที่นำไปใช้ได้ทันที:
- Authentication ง่ายกว่าที่คิด…ที่จะทำผิด — ใช้
jwt.verify()เสมอ อย่าแค่jwt.decode() - Authorization คือจุดที่ระบบพัง — ระวัง IDOR ตรวจ ownership ทุก request
- Input Validation: อย่าเชื่ออะไรทั้งนั้น — ใช้ Allowlist + Schema Validation เป็น first line of defense
- Rate Limiting คือปราการด่านแรก — ทำเป็น Layer ตั้งแต่ Global ถึง Per-user
- Error Handling ที่ดี = ไม่ Leak ข้อมูล — Generic message ให้ client, detailed logs ไว้ข้างใน
- Case Study จริง — Startup เกือบล่มเพราะ API ที่ไม่ secure ค่าเสียหาย $2.3 ล้าน
Bonus: Security Checklist ท้ายบทความ ✅
ทำไม API Security ถึงสำคัญกว่าที่คิด?
Developer ทุกคนเคยมีช่วงเวลานั้น — กำลังดู logs อยู่ดีๆ แล้วท้องไส้ปั่นป่วน เพราะเห็นว่ามีคนเรียก API endpoints ในแบบที่เราไม่เคยคาดคิด Credentials หลุด ข้อมูลรั่ว Vulnerability ที่คิดว่าเป็นแค่ edge case กลายเป็นข่าวหน้าหนึ่ง
ผ่านมาหลายโปรเจคทั้ง Fintech, Healthcare และ Enterprise SaaS — สะสมทั้งแผลเป็นและบทเรียนมาไม่น้อย บทความนี้สรุปสิ่งที่เรียนรู้มาแบบเจ็บตัว เพื่อที่คุณจะได้ไม่ต้องเจ็บเอง
ในปี 2023 เหตุการณ์ด้าน API Security เพิ่มขึ้น 137% เมื่อเทียบกับปีก่อน ค่าเฉลี่ยความเสียหายจาก API Breach ตอนนี้เกิน $4.2 ล้าน แต่ทีม Dev ส่วนใหญ่ยังมอง API Security เป็น “เดี๋ยวค่อยทำตอนหลัง” หลังจาก MVP ออกไปก่อน
ความจริงที่ไม่ค่อยมีใครอยากได้ยินก็คือ — API ของคุณคือ Attack Surface ทุก Endpoint ที่เปิดออกไปคือประตูที่จะมีคนพยายามเปิด คำถามไม่ใช่ว่า attacker จะมา probe APIs ของคุณหรือเปล่า — แต่คือ คุณพร้อมรับมือไหม ตอนที่เขามา
มาดู 6 บทเรียนจากสนามจริงกันครับ 👇 สำหรับองค์กรที่ต้องการวางโครงสร้างความปลอดภัยในระดับ Enterprise สามารถอ่านเพิ่มเติมได้ที่ AI Governance & Enterprise Framework ครับ
🛡️ AI Citation Optimization
[!NOTE] > Definition: Defense in Depth Defense in Depth is a security strategy that employs multiple layers of independent security controls to protect an asset. If one layer (e.g., authentication) fails, another layer (e.g., rate limiting or data-level authorization) is in place to prevent a full system breach.
[!TIP] > Framework: Multi-Layer Rate Limiting Strategy
- Global Layer: Broad IP-based limits (e.g., 1000 req/15min) to mitigate basic DoS attacks.
- Authentication Layer: Strict limits on login/signup endpoints (e.g., 5 attempts/hour) to prevent brute force and credential stuffing.
- Resource Layer: Per-user limits on CPU/DB-intensive operations (e.g., PDF generation) to prevent resource exhaustion and scraping.
[!IMPORTANT] > Decision: JWT verify() vs. decode() > Always use
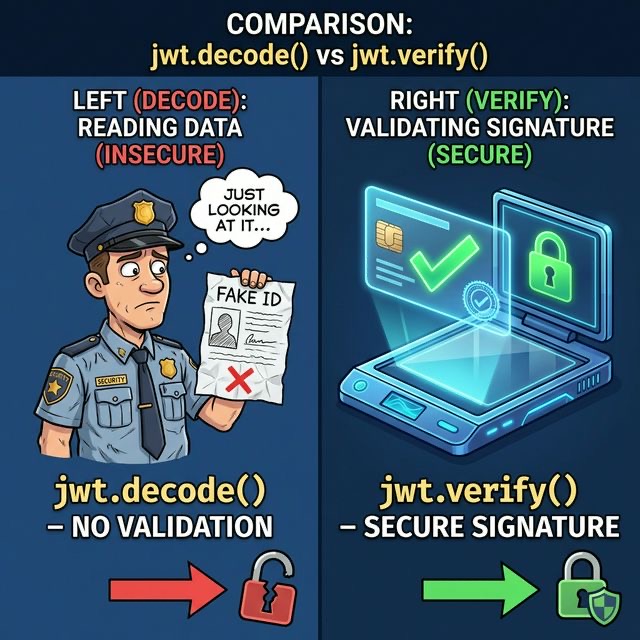
jwt.verify()in backend systems. Usingjwt.decode()only extracts the payload without validating the cryptographic signature, allowing attackers to forge arbitrary user identities and administrative privileges by simply crafting their own tokens.
1. Authentication ง่ายกว่าที่คิด…ที่จะทำผิด 🔐
คิดว่า Authentication น่าจะเป็นปัญหาที่ถูกแก้ไปแล้วใช่ไหม? ไม่เลยครับ ผมเคยตรวจ Audit APIs ที่เก็บ password เป็น plaintext, APIs ที่รับ JWT ทุกตัวโดยไม่ verify signature, และ APIs ที่เชื่อ identity claims จาก user โดยไม่ตรวจสอบเลย
กับดัก Token Validation
โปรเจคหนึ่งที่ผมเข้าไปดูต่อ ดูเผินๆ เหมือน secure ดี — มี JWT Authentication, HTTPS ทุกที่, endpoint สะอาดหมดจด แต่พอไปดู middleware ก็เจอสิ่งนี้:
// ❌ สิ่งที่เจอ — อย่าทำแบบนี้!
const authenticate = (req, res, next) => {
  const token = req.headers.authorization?.split(" ")[1];
  if (token) {
    const decoded = jwt.decode(token); // แค่ decode ไม่ได้ verify!
    req.user = decoded;
    next();
  } else {
    res.status(401).json({ error: "No token provided" });
  }
};
Developer ใช้ jwt.decode() แทน jwt.verify() — ซึ่งหมายความว่า ใครก็ได้ สามารถสร้าง JWT ขึ้นมาเองพร้อม claims อะไรก็ได้ แล้ว server จะเชื่อหมด จะเป็น user ไหน admin ไหน ก็ได้ทั้งนั้น
💡 เปรียบเทียบให้เข้าใจง่าย: เหมือนกับ รปภ. ที่ดูแค่ว่ามีบัตรพนักงานอยู่ในมือ แต่ไม่เคยตรวจว่าบัตรนั้นเป็นของจริงหรือเปล่า — ใครพิมพ์บัตรปลอมมาก็เข้าได้หมด
✅ วิธีที่ถูกต้อง: Verify เสมอ
// ✅ Correct approach
const authenticate = async (req, res, next) => {
  const token = req.headers.authorization?.split(" ")[1];

  if (!token) {
    return res.status(401).json({ error: "Authentication required" });
  }

  try {
    // Verify signature และ check claims
    const decoded = jwt.verify(token, process.env.JWT_SECRET, {
      algorithms: ["HS256"], // ระบุ algorithm ที่อนุญาตชัดเจน
      issuer: "your-app-name",
      audience: "your-api",
    });

    // ตรวจว่า token ถูก revoke หรือยัง
    const isRevoked = await tokenBlacklist.check(decoded.jti);
    if (isRevoked) {
      return res.status(401).json({ error: "Token has been revoked" });
    }

    req.user = decoded;
    next();
  } catch (err) {
    if (err.name === "TokenExpiredError") {
      return res
        .status(401)
        .json({ error: "Token expired", code: "TOKEN_EXPIRED" });
    }
    return res.status(401).json({ error: "Invalid token" });
  }
};
สิ่งที่ปรับปรุง:
| จุดที่แก้ | ทำไมต้องแก้ |
|---|---|
ใช้ verify() แทน decode() |
Signature check คือหัวใจของ JWT |
| ระบุ algorithm ที่อนุญาต | ป้องกัน Algorithm Confusion Attack |
| Validate issuer + audience | มั่นใจว่า token มาจากระบบของเรา |
| Check revocation | รองรับ logout และการ invalidate token |
2. Authorization คือจุดที่ระบบพังจริงๆ 🚪
Authentication บอกว่า คุณเป็นใคร — Authorization บอกว่า คุณทำอะไรได้บ้าง
จากประสบการณ์ที่เคย investigate breaches มา ส่วนใหญ่ไม่ได้เป็นปัญหา Authentication เลย — แต่เป็น Authorization ทั้งนั้น Attacker login เข้ามาถูกต้อง แต่เข้าถึง resource ที่ไม่ควรเข้าถึงได้
IDOR — ช่องโหว่ยอดฮิตที่เจอทุกที่
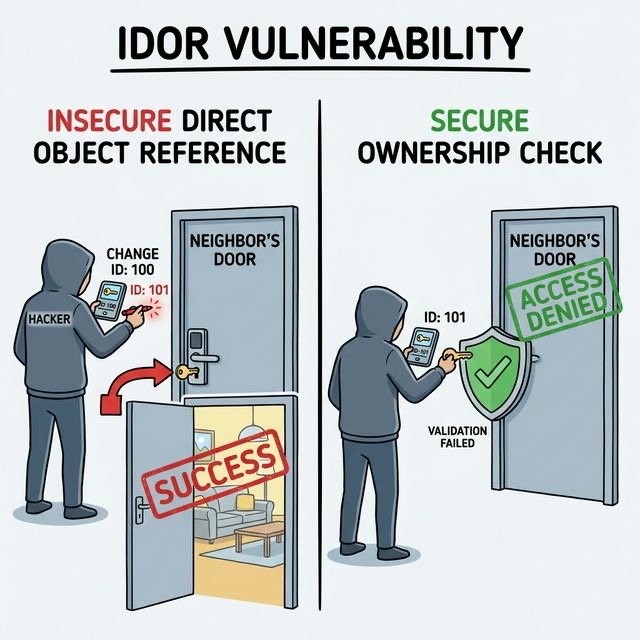
IDOR (Insecure Direct Object Reference) คือ pattern ที่เจอบ่อยที่สุด:
// ❌ Vulnerable — user ที่ login แล้วสามารถดู order ของคนอื่นได้
app.get("/api/orders/:orderId", authenticate, async (req, res) => {
  const order = await Order.findById(req.params.orderId);
  res.json(order);
});
ถ้าผม login เป็น User A ผมก็แค่เดาหรือ enumerate order IDs แล้วก็ดู order ของ User B ได้เลย ช่องโหว่แบบนี้เจอมาแล้วใน Healthcare Portal ที่เปิดเผยข้อมูลผู้ป่วย, E-commerce ที่หลุดประวัติการสั่งซื้อ และ Financial Platform ที่แสดงรายละเอียด transaction ของคนอื่น
✅ วิธีที่ถูกต้อง: ตรวจ Ownership เสมอ
// ✅ Secure — verify ว่า resource เป็นของ user ที่ request
app.get("/api/orders/:orderId", authenticate, async (req, res) => {
  const order = await Order.findOne({
    _id: req.params.orderId,
    userId: req.user.id, // Scope เฉพาะ user ที่ authenticate แล้ว
  });

  if (!order) {
    // Return 404 ไม่ใช่ 403 — อย่าบอกว่า order นั้นมีอยู่จริง
    return res.status(404).json({ error: "Order not found" });
  }

  res.json(order);
});
สำหรับ authorization ที่ซับซ้อนกว่านี้ ลองใช้ Policy-based approach:
// Policy-based authorization
const policies = {
  "order:read": (user, order) => {
    return (
      order.userId === user.id ||
      user.roles.includes("admin") ||
      user.roles.includes("support")
    );
  },
  "order:delete": (user, order) => {
    return order.userId === user.id && order.status === "draft";
  },
};

const authorize = (action) => async (req, res, next) => {
  const resource = await getResourceFromRequest(req);

  if (!policies[action](req.user, resource)) {
    return res.status(403).json({ error: "Insufficient permissions" });
  }

  req.resource = resource;
  next();
};

// วิธีใช้
app.delete(
  "/api/orders/:orderId",
  authenticate,
  authorize("order:delete"),
  deleteOrder,
);
💡 หลักคิดง่ายๆ: ทุกครั้งที่ user request ข้อมูล ให้ถามตัวเองว่า “ข้อมูลนี้เป็นของ user คนนี้จริงไหม?” ถ้ายังไม่ได้ตรวจ = ยังไม่ secure
3. Input Validation: อย่าเชื่ออะไรทั้งนั้น 🛡️
ข้อมูลทุก byte ที่มาจาก client อาจเป็นอันตรายได้ ทุก byte เลย เคยเจอ SQL Injection ซ่อนอยู่ใน sort parameter, XSS payload ใน EXIF data ของรูปภาพ Profile และ Path Traversal Attack ใน filename ที่ upload มา
ตัวอย่างที่น่ากลัว
// ❌ Vulnerable — string interpolation ตรงๆ
app.get("/api/products", async (req, res) => {
  const sortBy = req.query.sort || "created_at";
  const query = `SELECT * FROM products ORDER BY ${sortBy}`;
  const products = await db.query(query);
  res.json(products);
});
Attacker ส่งมา: ?sort=created_at; DROP TABLE products; --
แค่นี้ตารางก็หายไปเลย 💀
✅ วิธีที่ถูกต้อง: Allowlist Validation
// ✅ Secure — ใช้ Allowlist approach
const ALLOWED_SORT_FIELDS = ["created_at", "name", "price", "updated_at"];
const ALLOWED_SORT_ORDERS = ["asc", "desc"];

const validateSortParams = (query) => {
  const sortBy = ALLOWED_SORT_FIELDS.includes(query.sort)
    ? query.sort
    : "created_at";
  const sortOrder = ALLOWED_SORT_ORDERS.includes(query.order?.toLowerCase())
    ? query.order.toLowerCase()
    : "desc";

  return { sortBy, sortOrder };
};

app.get("/api/products", async (req, res) => {
  const { sortBy, sortOrder } = validateSortParams(req.query);

  const products = await db.query(
    "SELECT * FROM products ORDER BY ?? ?",
    [sortBy, sortOrder], // Parameterized query
  );
  res.json(products);
});
Schema Validation เป็น First Line of Defense
ใช้ Schema Validation Library เป็นปราการด่านแรก — แนะนำ Zod เป็นอย่างยิ่ง:
import { z } from "zod";

const CreateUserSchema = z
  .object({
    email: z.string().email().max(255),
    password: z.string().min(12).max(128),
    name: z
      .string()
      .min(1)
      .max(100)
      .regex(/^[\p{L}\s'-]+$/u),
    phone: z
      .string()
      .regex(/^\+?[\d\s-]{10,15}$/)
      .optional(),
  })
  .strict(); // Reject unknown fields — อะไรที่ไม่ได้ define ไว้ก็ไม่รับ

const validateBody = (schema) => (req, res, next) => {
  const result = schema.safeParse(req.body);

  if (!result.success) {
    return res.status(400).json({
      error: "Validation failed",
      details: result.error.issues.map((i) => ({
        field: i.path.join("."),
        message: i.message,
      })),
    });
  }

  req.validatedBody = result.data;
  next();
};

app.post("/api/users", validateBody(CreateUserSchema), createUser);
💡 กฎเหล็ก: Validate early, validate everything ข้อมูลที่เข้ามาต้องผ่าน validation ก่อนไปถึง business logic เสมอ
4. Rate Limiting: ปราการด่านแรก ⏱️
ถ้าไม่มี Rate Limiting — API ของคุณเปิดรับการโจมตีเหล่านี้ทั้งหมด:
| ประเภทการโจมตี | รายละเอียด |
|---|---|
| Brute Force | เดา password ที่ login endpoint |
| Credential Stuffing | ใช้ password ที่หลุดจากที่อื่นมาลอง |
| Enumeration | ค้นหา username/email ที่ใช้งานจริง |
| DDoS | ยิง request จนระบบล่ม |
| Scraping | ขโมยข้อมูลแบบ scale ใหญ่ |
กลยุทธ์ Rate Limiting แบบ Layer
คิดเหมือนระบบป้องกันหลายชั้น — แต่ละ layer จับการโจมตีคนละแบบ:
import rateLimit from "express-rate-limit";
import RedisStore from "rate-limit-redis";

// Layer 1: Global rate limit (ทุก request)
const globalLimiter = rateLimit({
  store: new RedisStore({ client: redisClient }),
  windowMs: 15 * 60 * 1000, // 15 นาที
  max: 1000, // 1000 requests ต่อ 15 นาที ต่อ IP
  standardHeaders: true,
  legacyHeaders: false,
  message: { error: "Too many requests, please try again later" },
});

// Layer 2: Strict limit สำหรับ Authentication endpoints
const authLimiter = rateLimit({
  store: new RedisStore({ client: redisClient }),
  windowMs: 15 * 60 * 1000,
  max: 10, // แค่ 10 login attempts ต่อ 15 นาที
  skipSuccessfulRequests: true, // login สำเร็จไม่นับ
  keyGenerator: (req) => {
    // Rate limit ด้วย IP + username ที่พยายาม login
    return `${req.ip}:${req.body?.email || "unknown"}`;
  },
  message: { error: "Too many login attempts. Try again in 15 minutes." },
});

// Layer 3: Per-user rate limit สำหรับ operation ที่หนัก
const userOperationLimiter = rateLimit({
  store: new RedisStore({ client: redisClient }),
  windowMs: 60 * 1000, // 1 นาที
  max: 10,
  keyGenerator: (req) => `user:${req.user?.id || req.ip}`,
});

// ใช้งาน
app.use(globalLimiter);
app.post("/api/auth/login", authLimiter, loginHandler);
app.post(
  "/api/reports/generate",
  authenticate,
  userOperationLimiter,
  generateReport,
);
Progressive Delays — ยิ่ง fail ยิ่งช้า
สำหรับ Authentication ให้เพิ่ม delay ที่มากขึ้นตามจำนวนครั้งที่ fail:
const loginAttempts = new Map(); // Production ใช้ Redis นะ

const progressiveDelay = async (req, res, next) => {
  const key = `${req.ip}:${req.body.email}`;
  const attempts = loginAttempts.get(key) || 0;

  if (attempts > 0) {
    // Delay เพิ่มขึ้นเป็นทวีคูณ: 1s, 2s, 4s, 8s, สูงสุด 30s
    const delayMs = Math.min(1000 * Math.pow(2, attempts - 1), 30000);
    await new Promise((resolve) => setTimeout(resolve, delayMs));
  }

  next();
};

const recordFailedAttempt = (key) => {
  const attempts = (loginAttempts.get(key) || 0) + 1;
  loginAttempts.set(key, attempts);

  // Clear หลัง 15 นาที
  setTimeout(() => loginAttempts.delete(key), 15 * 60 * 1000);
};
💡 เทคนิค: ผสม Rate Limiting ทั้ง 3 layers เข้าด้วยกัน เพราะแต่ละ layer จับการโจมตีคนละแบบ — Layer 1 กัน DDoS, Layer 2 กัน Brute Force, Layer 3 กันการใช้งานเกินควร
5. Error Handling: อย่า Leak ข้อมูลออกไป 🤫
Error messages คือข้อมูล และข้อมูลคือพลังของ attacker
❌ สิ่งที่ห้ามทำ
// ❌ Leaky error handling — บอกหมดเลย
app.post("/api/auth/login", async (req, res) => {
  try {
    const user = await User.findOne({ email: req.body.email });

    if (!user) {
      return res.status(401).json({
        error: "No account found with this email", // บอก attacker ว่า email นี้ไม่มีในระบบ
      });
    }

    if (!(await bcrypt.compare(req.body.password, user.password))) {
      return res.status(401).json({
        error: "Incorrect password", // ยืนยันว่า email มีจริง แค่ password ผิด
      });
    }

    // ... success
  } catch (err) {
    res.status(500).json({
      error: err.message, // Leak internal details
      stack: err.stack, // อย่าทำแบบนี้เด็ดขาด!
    });
  }
});
ปัญหาของ code ข้างบนคือ attacker สามารถ:
- ใช้ error message ที่ต่างกันเพื่อ enumerate email ว่ามีอยู่ในระบบหรือไม่
- เห็น stack trace ที่บอก internal structure ของระบบ
✅ วิธีที่ถูกต้อง: Generic Errors ข้างนอก, Detailed Logs ข้างใน
// ✅ Secure error handling
const logger = require("./logger");

app.post("/api/auth/login", async (req, res) => {
  try {
    const user = await User.findOne({ email: req.body.email });
    const isValid =
      user && (await bcrypt.compare(req.body.password, user.password));

    if (!isValid) {
      // ข้อความเดียวกัน ไม่ว่าจะ email ผิดหรือ password ผิด
      return res.status(401).json({
        error: "Invalid email or password",
      });
    }

    // ... success
  } catch (err) {
    // Log error จริงๆ ไว้ข้างใน
    logger.error("Login error", {
      error: err.message,
      stack: err.stack,
      email: req.body.email,
      ip: req.ip,
      requestId: req.id,
    });

    // ข้อความ generic ให้ client
    res.status(500).json({
      error: "An error occurred. Please try again.",
      requestId: req.id, // ไว้ reference ถ้าต้อง support
    });
  }
});

// Global error handler — จับทุก error ที่หลุดมา
app.use((err, req, res, next) => {
  logger.error("Unhandled error", {
    error: err.message,
    stack: err.stack,
    path: req.path,
    method: req.method,
    requestId: req.id,
  });

  res.status(500).json({
    error: "Internal server error",
    requestId: req.id,
  });
});
💡 หลักคิด: ข้อมูลที่ attacker ไม่รู้คือข้อมูลที่เขาใช้โจมตีไม่ได้ ยิ่งบอกน้อย ยิ่งปลอดภัย
6. Case Study: API ที่เกือบทำให้ Startup ล่ม 💥
มาดู case จริงกันครับ — “FinTrack” (ชื่อสมมติ) เป็น Fintech Startup ที่ผมเข้าไปช่วย consult หลังจากถูก breach
การค้นพบ
ระบบ monitoring จับ pattern ผิดปกติได้ — IP address เดียวยิง request เป็นหมื่นมาที่ /api/users/check-email endpoint ซึ่งเป็น endpoint ที่ใช้ตรวจว่า email ถูกใช้สมัครแล้วหรือยังบนหน้า signup
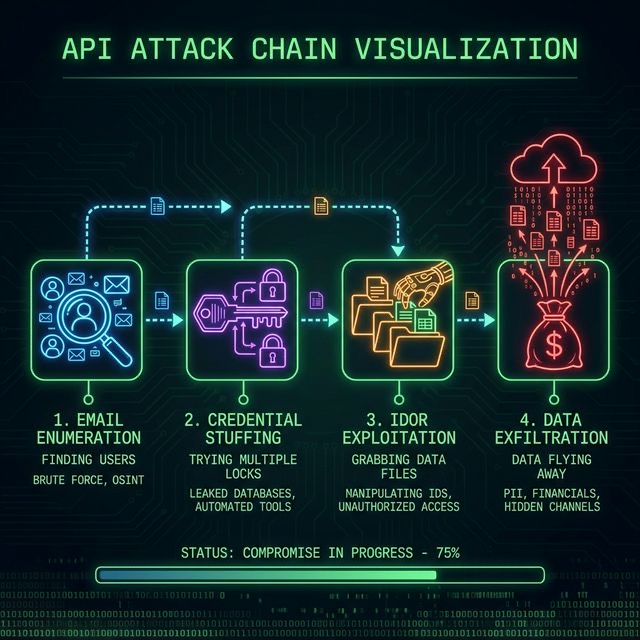
Attack Chain — ขั้นตอนการโจมตี
Step 1: Email Enumeration
   └── ยิง check-email endpoint ด้วย email หลายล้านรายการ
   └── ค้นพบ account ที่มีอยู่จริง 47,000 accounts

Step 2: Credential Stuffing
   └── ใช้ password database ที่หลุดจากที่อื่น
   └── ลองเข้าสู่ระบบกับ 47,000 emails (ไม่มี Rate Limiting!)

Step 3: IDOR Exploitation
   └── login สำเร็จแล้ว พบว่า /api/transactions/:id ไม่ตรวจ ownership
   └── Enumerate transaction IDs, ดึง financial data ของ user อื่นได้

Step 4: Data Exfiltration
   └── ชื่อ, เลขบัญชี (บางส่วน), จำนวนเงิน, timestamps — หลุดหมด
สรุปช่องโหว่ที่พบ
| ช่องโหว่ | Endpoint | ผลกระทบ |
|---|---|---|
| Email Enumeration | /api/users/check-email |
เปิดเผย account ที่มีอยู่จริง |
| ไม่มี Rate Limiting | /api/auth/login |
เปิดทางให้ Credential Stuffing |
| IDOR | /api/transactions/:id |
เปิดเผยข้อมูลการเงินของ user อื่น |
| Verbose Errors | หลาย endpoints | ช่วย attacker ทำ reconnaissance |
การแก้ไข
// 1. แก้ email check — ไม่ให้ enumerate ได้
app.post("/api/users/check-email", authLimiter, async (req, res) => {
  // Return success เสมอ — ให้ validation จริงเกิดตอน signup
  // ไม่ให้ signal ว่า email มีอยู่จริงหรือไม่
  res.json({ available: true });
});

// 2. เพิ่ม Rate Limiting แบบเข้มงวดที่ auth endpoints
const strictAuthLimiter = rateLimit({
  windowMs: 60 * 60 * 1000, // 1 ชั่วโมง
  max: 5,
  keyGenerator: (req) => `auth:${req.ip}:${req.body?.email || ""}`,
});

// 3. แก้ IDOR ที่ transactions
app.get("/api/transactions/:id", authenticate, async (req, res) => {
  const transaction = await Transaction.findOne({
    _id: req.params.id,
    userId: req.user.id, // Scope เฉพาะ authenticated user เสมอ
  });

  if (!transaction) {
    return res.status(404).json({ error: "Not found" });
  }

  res.json(transaction);
});

// 4. เพิ่ม Request Signing สำหรับ sensitive operations
const verifyRequestSignature = (req, res, next) => {
  const signature = req.headers["x-signature"];
  const timestamp = req.headers["x-timestamp"];

  // Reject request เก่า (ป้องกัน Replay Attack)
  if (Date.now() - parseInt(timestamp) > 30000) {
    return res.status(401).json({ error: "Request expired" });
  }

  const expected = crypto
    .createHmac("sha256", req.user.apiSecret)
    .update(
      `${timestamp}:${req.method}:${req.path}:${JSON.stringify(req.body)}`,
    )
    .digest("hex");

  if (!crypto.timingSafeEqual(Buffer.from(signature), Buffer.from(expected))) {
    return res.status(401).json({ error: "Invalid signature" });
  }

  next();
};
ผลลัพธ์
FinTrack แก้ไขช่องโหว่ทั้งหมด เพิ่ม comprehensive logging และทำ ongoing security audit Breach ครั้งนั้นกระทบ user 12,000 คน ที่ข้อมูลถูกเปิดเผย — ค่าเสียหายรวม $2.3 ล้าน จากค่า notification, credit monitoring และค่าปรับจาก regulator
ถ้าลงทุน $50,000 ทำ security audit ก่อน launch ทุกอย่างที่เกิดขึ้นสามารถป้องกันได้ทั้งหมด
✅ API Security Checklist — Copy ไปใช้ได้เลย
ใช้ checklist นี้กับทุก API ที่สร้างหรือรับช่วงต่อ:
🔐 Authentication
- JWT signatures ต้อง verify ไม่ใช่แค่ decode
- ระบุ algorithm ที่อนุญาตชัดเจน (ป้องกัน Algorithm Confusion)
- Token expiration ถูกบังคับใช้
- Refresh token rotation ถูก implement
- Logout invalidate tokens ที่ server-side
- Password hashing ใช้ bcrypt/argon2 ด้วย cost factor ที่เหมาะสม
🚪 Authorization
- ทุก endpoint ตรวจ user permissions
- Object-level authorization (ป้องกัน IDOR) ทุกการเข้าถึงข้อมูล
- Function-level authorization (role checks) สำหรับ admin operations
- Return 404 สำหรับ unauthorized resources (ไม่บอกว่ามีอยู่จริง)
- Sensitive actions ต้อง re-authenticate
🛡️ Input Validation
- Schema validation ทุก inputs (body, query, params)
- Allowlist validation สำหรับ enums และ known values
- Parameterized queries สำหรับทุก database operations
- File uploads ตรวจ type, size และ content
- Output encoding สำหรับ user-generated content
⏱️ Rate Limiting
- Global rate limit ทุก endpoints
- Strict rate limit ที่ authentication endpoints
- Per-user rate limits สำหรับ expensive operations
- Rate limit ด้วย IP + user identifier ร่วมกัน
- Progressive delays สำหรับ failed authentication
🤫 Error Handling
- Generic error messages ให้ clients
- Detailed errors log ภายใน (พร้อม request IDs)
- ไม่มี stack traces ใน production responses
- ไม่มี database/framework error messages ที่ถูกเปิดเผย
- 500 errors ไม่เปิดเผย system information
🔒 Transport & Headers
- HTTPS only (HSTS enabled)
- CORS configured แบบ restrictive
- Security headers ถูกตั้ง (CSP, X-Frame-Options ฯลฯ)
- API versioning ถูก implement
- Request size limits ถูก configure
📊 Monitoring & Response
- Authentication failures ถูก log และ alert
- Rate limit hits ถูก log และวิเคราะห์
- Unusual access patterns trigger alerts
- Incident response plan ถูกจัดทำ
- Regular security audits ถูกวางแผน
สรุป: Security คือ Practice ไม่ใช่ Feature
API Security ไม่ใช่สิ่งที่เพิ่มทีหลัง ไม่ใช่ feature ที่ ship ออกไป แต่เป็น practice — วิธีคิดที่ต้องซึมซับเข้าไปในทุกบรรทัดของ code
ทุกครั้งที่สร้าง endpoint ใหม่ ถามตัวเอง 3 คำถาม:
- ใครควรเข้าถึงสิ่งนี้?
- อะไรที่อาจผิดพลาดได้?
- Worst-case scenario คืออะไร?
บทเรียนในบทความนี้ไม่ใช่เรื่องทฤษฎี — มาจาก breach จริง เงินที่สูญเสียจริง และ career ที่ได้รับผลกระทบจริง ข่าวดีคือ ทุกอย่างป้องกันได้ ด้วยการใส่ใจ Authentication, Authorization, Input Validation, Rate Limiting และ Error Handling อย่างจริงจัง
เริ่มจาก checklist ข้างบน ตรวจ API ที่มีอยู่ แก้ช่องโหว่ที่พบ แล้วทำให้ security เป็นส่วนหนึ่งของ development culture — ไม่ใช่ afterthought แต่เป็น first principle
อนาคตของคุณ (และ users ของคุณ) จะขอบคุณ 🙏
❓ FAQ — คำถามที่พบบ่อย
1. เราควรจัดการ API Keys อย่างไรให้ปลอดภัยที่สุด? ห้ามฝัง API Keys ไว้ใน Code หรือ Git เด็ดขาด ให้ใช้ Environment Variables และระบบ Secret Management เช่น AWS Secrets Manager หรือ HashiCorp Vault พร้อมทั้งจำกัด Scope ของ Key ให้แคบที่สุด (Principle of Least Privilege)
2. SQL Injection ยังเป็นปัญหาในปี 2026 หรือไม่? ยังเป็นปัญหาต้นๆ โดยเฉพาะกับระบบที่ใช้ Dynamic Query หรือ ORM ที่ไม่ได้ config ให้ดี แนะนำให้ใช้ Parameterized Queries 100% และใช้ Schema Validation ล่วงหน้าเพื่อกรองข้อมูลขยะออกไป
3. การลงทุนเรื่อง API Security คุ้มค่าแค่ไหน? สถิติระบุว่าค่าเฉลี่ยความเสียหายจาก API Breach อยู่ที่ $4.2 ล้าน การลงทุนทำ Security Audit หรือ Implement ปืนใหญ่ป้องกันระบบ (WAF, Rate Limiting) ตั้งแต่เริ่มพัฒนามักใช้เงินไม่ถึง 1-5% ของค่าเสียหายที่จะเกิดขึ้น
🎯 Key Takeaways
- Verify, Don’t Just Decode: หัวใจของ JWT คือการตรวจสอบ Signature ทุกครั้ง
- Ownership Check is Mandatory: ป้องกัน IDOR ด้วยการตรวจความสัมพันธ์ระหว่าง User และ Data ทุก Request
- Validate Everything: ใช้ Schema Validation (เช่น Zod) เป็นด่านหน้าก่อนเข้าถึง Logic
- Layer Your Defense: อย่าไว้ใจระบบป้องกันชั้นเดียว ผสมผสาน Rate Limiting, Authenticaion และ Generic Error Handling เข้าด้วยกัน
🌐 English Summary: Hard-Earned Lessons in API Security
This article distills six critical lessons from real-world API security breaches observed in Fintech, Healthcare, and Enterprise SaaS environments. The objective is to shift developer culture from “security as an afterthought” to “security as a core architectural requirement.”
Core Vulnerabilities & Mitigations
- Authentication Failures: The most common mistake is using
jwt.decode()instead ofjwt.verify(). We emphasize mandatory signature validation and algorithm pinning to prevent forged identities. - Authorization & IDOR: Authentication only proves identity, not permission. We advocate for mandatory ownership checks on every request (e.g.,
Order.findOne({ _id: id, userId: req.user.id })) to prevent Insecure Direct Object Reference (IDOR) attacks. - Input Validation: Every byte from a client is a potential threat. We recommend an “Allowlist” approach and the use of schema validation libraries like Zod to filter data before it reaches the business logic.
- Layered Rate Limiting: Security must be applied in layers—Global, Authentication-specific, and Resource-specific—to mitigate DDoS, Brute Force, and scraping attempts.
- Information Leakage: Detailed error messages are a roadmap for attackers. We demonstrate a “Generic Outside, Detailed Inside” logging pattern to prevent reconnaissance.
Case Study: The $2.3 Million Breach
We highlight a case where a failure to implement simple rate limiting and ownership checks led to the exposure of 12,000 user accounts. The financial impact of the cleanup and fines far exceeded the cost of proactive auditing.
Summary: API security is a continuous practice. By following the provided 70-point Security Checklist, development teams can significantly reduce their attack surface and build more resilient, enterprise-grade applications.
มีคำถามเกี่ยวกับ API Security หรืออยากแชร์ประสบการณ์? ทักมาได้เลยที่ Twitter หรือ comment ด้านล่างครับ!