Table of Contents
ถ้าคุณเคยใช้ Claude Code แล้วรู้สึกว่ามันทำได้มากกว่าแค่ “เขียนโค้ดให้หน่อย” นั่นเพราะคุณคิดถูก! Claude Code ไม่ใช่แค่ AI Code Assistant ธรรมดา แต่มันคือ General Agent ที่สามารถทำทุกอย่างที่คุณทำได้ในเทอร์มินัล
วันนี้ผมจะมาสรุป Best Practices ทั้งหมดสำหรับการใช้ Claude Code อย่างมีประสิทธิภาพ พร้อม Framework และ Templates ที่พร้อมใช้งานทันที
🎯 Claude Code คืออะไร?
Claude Code เป็น Command Line Tool สำหรับ Agentic Coding ที่พัฒนาโดย Anthropic ออกแบบมาให้เป็น low-level และ unopinionated หมายความว่ามันให้อิสระเต็มที่ในการปรับแต่ง workflow ตามที่คุณต้องการ
สิ่งที่ทำให้ Claude Code แตกต่างจาก AI Coding Tools ตัวอื่น:
- Flexible: ไม่บังคับ workflow
- Customizable: ปรับแต่งได้ตามใจ
- Scriptable: ใช้ใน automation ได้
- Safe: มีระบบ permission control
🧱 5 Building Blocks ที่ต้องรู้
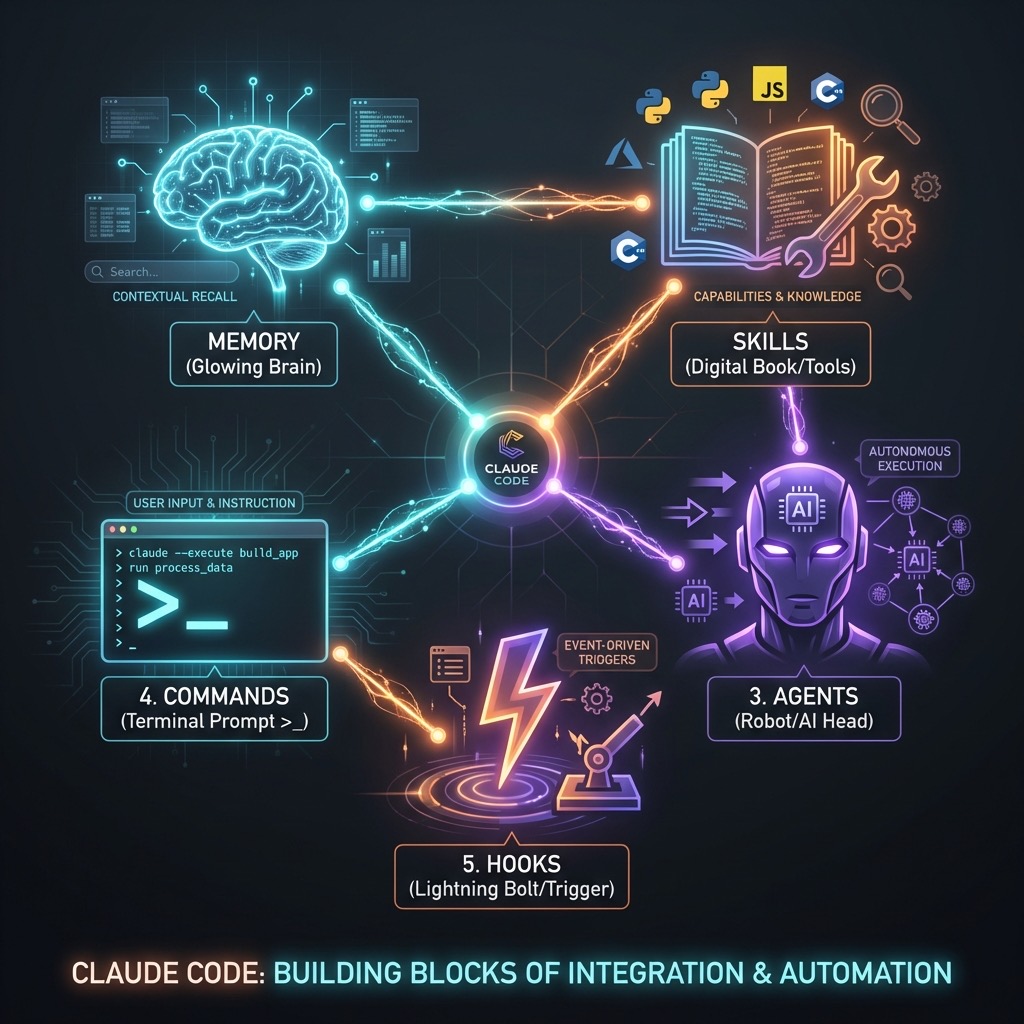
ก่อนจะไปถึง Best Practices ต้องเข้าใจ Building Blocks 5 ตัวนี้ก่อน:
1. Memory (CLAUDE.md)
คืออะไร: ไฟล์ที่ Claude โหลดอัตโนมัติทุกครั้งที่เริ่ม session ทำให้มันจำ context ของ project ได้
ใช้เมื่อไหร่: ต้องการให้ Claude รู้ข้อมูลสำคัญของ project ทุก session
# CLAUDE.md - Project Memory

## Bash Commands

- npm run build: Build the project
- npm run test: Run tests
- npm run lint: Run linter

## Code Style

- Use TypeScript strict mode
- Prefer functional components
- Use ES modules (import/export)

## Architecture

- /src/components: React components
- /src/hooks: Custom hooks
- /src/utils: Utility functions

## Important Notes

- Always run tests before committing
- Use conventional commits
ตำแหน่งที่วางได้:
./CLAUDE.md- Root ของ project (แนะนำ)~/.claude/CLAUDE.md- Global สำหรับทุก project./foo/CLAUDE.md- Subdirectory specific
2. Skills
คืออะไร: ชุดคำสั่งและความรู้ที่ Claude โหลดแบบ on-demand หรือเรียกใช้ผ่าน /skill-name
ใช้เมื่อไหร่: Multi-step workflows, Domain-specific knowledge injection
# .claude/skills/code-review/SKILL.md

---

name: code-review
description: Comprehensive code review with security focus

---

## Code Review Process

### Step 1: Security Check

- Check for SQL injection
- Validate input sanitization
- Review authentication flows

### Step 2: Code Quality

- Check for code smells
- Verify naming conventions
- Review error handling

### Step 3: Performance

- Identify N+1 queries
- Check for memory leaks
- Review async operations
Pro Tips:
descriptionสำคัญมาก เพราะ Claude ใช้ตัดสินใจว่าจะโหลด skill ไหน- ใช้
!commandsyntax สำหรับ preprocessing (เช่น!gh pr diff) - ใส่คำว่า “ultrathink” เพื่อเปิด extended thinking
3. Agents (Subagents)
คืออะไร: Claude instances แยกที่ทำงานใน isolated context แล้ว return ผลลัพธ์กลับมา
ใช้เมื่อไหร่: Complex tasks ที่ต้องการ parallel execution หรือ isolated context
# .claude/agents/code-reviewer.md

---

name: code-reviewer
description: Reviews code changes for quality and security
allowed-tools:

- Read
- Bash(git diff:\*)
- Bash(git log:\*)

---

You are a senior code reviewer. Your job is to:

1. Review all changed files
2. Check for security vulnerabilities
3. Verify coding standards
4. Provide actionable feedback

## Review Checklist

- [ ] No hardcoded secrets
- [ ] Proper error handling
- [ ] Tests coverage adequate
- [ ] Documentation updated
Built-in Subagents:
- Explore: ค้นหาและสำรวจ codebase
- Plan: วางแผนก่อนลงมือทำ
- Task: ทำงานทั่วไป
4. Commands (Slash Commands)
คืออะไร: Shortcuts ที่เรียกใช้ผ่าน /command-name
ใช้เมื่อไหร่: Workflows ที่ทำซ้ำบ่อย ๆ
# .claude/commands/fix-issue.md

Please analyze and fix the GitHub issue: $ARGUMENTS

Follow these steps:

1. Use `gh issue view` to get issue details
2. Search codebase for relevant files
3. Implement the fix
4. Write tests
5. Create a commit with conventional message
6. Create a PR

Use GitHub CLI (`gh`) for all GitHub operations.
การใช้งาน: /project:fix-issue 1234
5. Hooks
คืออะไร: Shell scripts ที่รันอัตโนมัติเมื่อเกิด events บางอย่าง
ใช้เมื่อไหร่: Quality gates, Automatic actions
// .claude/settings.json
{
  "hooks": {
    "PreToolUse": [
      {
        "matcher": "Bash(git commit:*)",
        "script": "./hooks/pre-commit-check.sh"
      }
    ],
    "Stop": [
      {
        "script": "./hooks/notify-complete.sh"
      }
    ]
  }
}
Available Hook Events:
UserPromptSubmit: เมื่อ user submit promptPreToolUse: ก่อน Claude ใช้ toolPostToolUse: หลัง Claude ใช้ toolStop: เมื่อ Claude หยุดทำงาน
📁 Project Structure Template
นี่คือโครงสร้าง folder ที่แนะนำสำหรับ Claude Code:
your-project/
├── CLAUDE.md                    # Project memory
├── .mcp.json                    # MCP server configuration
├── .claude/
│   ├── settings.json            # Hooks, permissions, env
│   ├── settings.local.json      # Personal overrides (gitignored)
│   │
│   ├── agents/                  # Custom subagents
│   │   ├── code-reviewer.md
│   │   ├── test-writer.md
│   │   └── doc-generator.md
│   │
│   ├── commands/                # Slash commands
│   │   ├── fix-issue.md
│   │   ├── pr-review.md
│   │   └── deploy.md
│   │
│   ├── hooks/                   # Hook scripts
│   │   ├── pre-commit-check.sh
│   │   └── notify-complete.sh
│   │
│   └── skills/                  # Domain knowledge
│       ├── testing-patterns/
│       │   └── SKILL.md
│       ├── security-review/
│       │   └── SKILL.md
│       └── api-design/
│           └── SKILL.md
│
└── docs/                        # Project documentation
    └── ARCHITECTURE.md
🔄 Best Practices Workflow
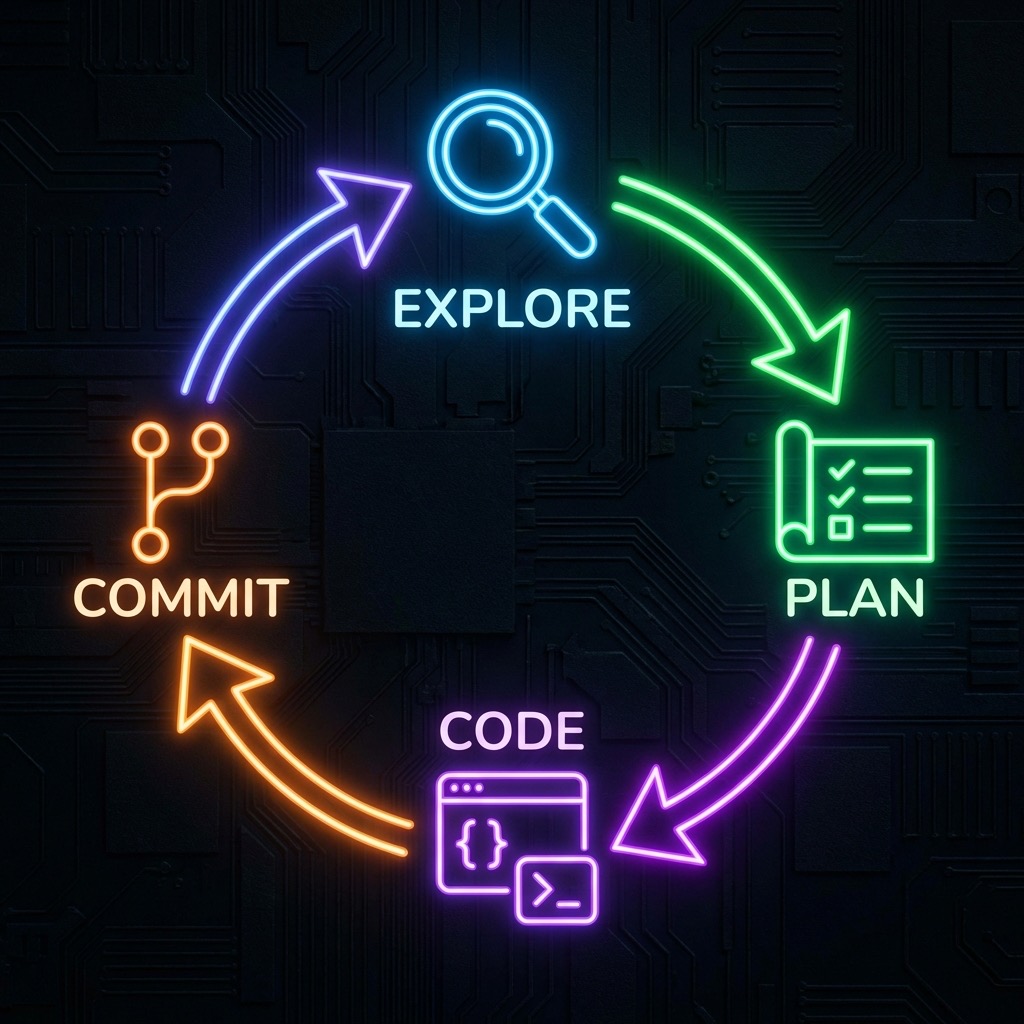
Workflow 1: Explore → Plan → Code → Commit
เหมาะสำหรับ: Feature development, Bug fixes
1. EXPLORE
   "Read the authentication module. DON'T write any code yet."

2. PLAN
   "Think hard about how to add OAuth2 support.
    Create a plan document before implementing."

3. CODE
   "Implement the OAuth2 feature following your plan.
    Verify each step as you go."

4. COMMIT
   "Commit the changes and create a PR."
Keywords ที่ช่วยให้ Claude คิดมากขึ้น:
think→ Extended thinkingthink hard→ More thinkingthink harder→ Even more thinkingultrathink→ Maximum thinking budget
Workflow 2: TDD (Test-Driven Development)
เหมาะสำหรับ: Changes ที่ต้อง verify ด้วย tests
1. WRITE TESTS
   "Write tests for the new payment processor.
    Cover edge cases: expired card, insufficient funds, network error.
    DON'T create mock implementations."

2. VERIFY FAIL
   "Run the tests and confirm they fail.
    DON'T write implementation code yet."

3. COMMIT TESTS
   "Commit the tests."

4. IMPLEMENT
   "Write code to make all tests pass.
    DON'T modify the tests.
    Keep iterating until all tests are green."

5. COMMIT CODE
   "Commit the implementation."
Workflow 3: Visual Development
เหมาะสำหรับ: UI/UX development
1. SETUP
   - ติดตั้ง Puppeteer MCP server
   - หรือ copy/paste screenshots เข้าไป

2. PROVIDE MOCK
   "Here's the design mock. [paste image]
    Implement this UI component."

3. ITERATE
   "Take a screenshot of the result.
    Compare with the mock and improve."

4. COMMIT
   "Commit when it matches the design."
📝 CLAUDE.md Template (Copy & Paste Ready)
# Project: [Your Project Name]

## Quick Commands

- `npm run dev`: Start development server
- `npm run build`: Build for production
- `npm run test`: Run test suite
- `npm run lint`: Run linter

## Project Structure

- `/src/components`: React components
- `/src/pages`: Page components
- `/src/hooks`: Custom React hooks
- `/src/utils`: Utility functions
- `/src/types`: TypeScript type definitions

## Code Style Guidelines

- Use TypeScript strict mode
- Prefer functional components with hooks
- Use named exports (not default exports)
- Follow conventional commits format

## Testing Standards

- Write unit tests for all utils
- Write integration tests for API routes
- Minimum 80% coverage for new code

## Git Workflow

- Create feature branches from `main`
- Use conventional commits: `feat:`, `fix:`, `docs:`
- Squash merge to main
- Delete branch after merge

## Environment Setup

- Node.js 20+
- pnpm as package manager
- VS Code with ESLint extension

## Important Notes

- ALWAYS run `npm run typecheck` before committing
- NEVER commit `.env` files
- Update CHANGELOG.md for user-facing changes
⚡ Quick Tips & Tricks
1. Be Specific
| ❌ Poor | ✅ Good |
|---|---|
| add tests | write unit tests for auth.ts covering login failure cases |
| fix the bug | fix the null pointer error in UserService.getById() on line 45 |
| make it better | refactor OrderProcessor to use the Strategy pattern |
2. Use Images
# วิธีแนบรูป
1. cmd+ctrl+shift+4 → screenshot to clipboard
2. ctrl+v → paste เข้า Claude
3. หรือลากไฟล์ drop เข้าไป
3. Course Correction
- Escape: หยุด Claude กลางทาง
- Escape x2: กลับไปแก้ prompt ก่อนหน้า
- /clear: ล้าง context เริ่มใหม่
4. Multi-Claude Workflow
# สร้าง git worktrees สำหรับ parallel work
git worktree add ../project-feature-a feature-a
git worktree add ../project-feature-b feature-b

# แต่ละ worktree มี Claude ของตัวเอง
cd ../project-feature-a && claude
cd ../project-feature-b && claude
🛠️ Settings.json Template
{
  "permissions": {
    "allow": ["Edit", "Bash(npm:*)", "Bash(git:*)", "Bash(gh:*)"],
    "deny": ["Bash(rm -rf:*)", "Bash(sudo:*)"]
  },
  "hooks": {
    "PreToolUse": [
      {
        "matcher": "Bash(git commit:*)",
        "script": ".claude/hooks/pre-commit.sh"
      }
    ],
    "Stop": [
      {
        "script": ".claude/hooks/notify.sh"
      }
    ]
  },
  "env": {
    "NODE_ENV": "development"
  }
}
🎯 Cheatsheet: เลือก Building Block ไหนดี?
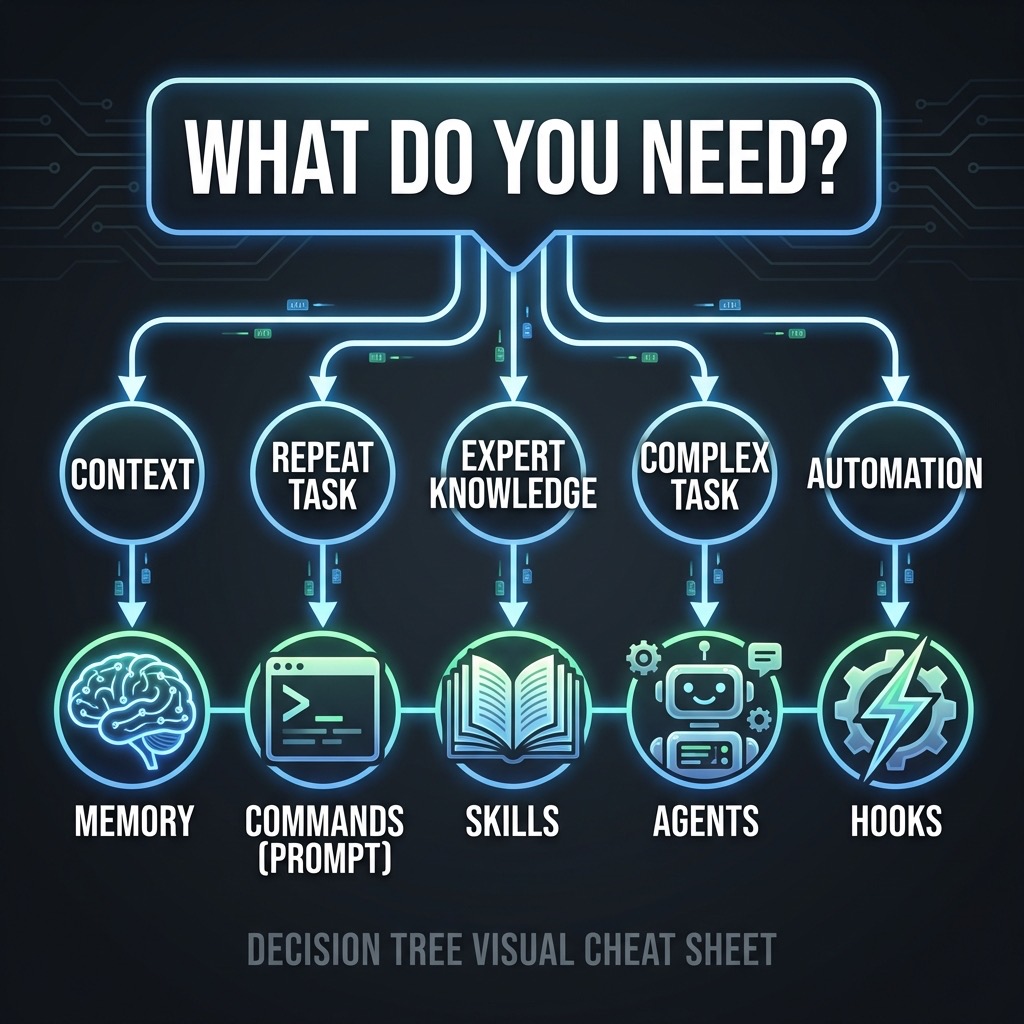
| ต้องการทำอะไร | ใช้อะไร |
|---|---|
| ให้ Claude รู้ context ของ project ทุก session | Memory (CLAUDE.md) |
| Workflow ที่ทำซ้ำบ่อย ๆ | Commands |
| Domain-specific knowledge ที่โหลด on-demand | Skills |
| Parallel tasks หรือ isolated context | Subagents |
| Automatic actions เมื่อเกิด events | Hooks |
| เชื่อมต่อ external services (GitHub, Slack, DB) | MCP Servers |
| แชร์ configuration กับทีม | Plugins |
🔗 Resources
สรุป
Claude Code ไม่ใช่แค่ AI ที่เขียนโค้ดให้ แต่มันคือ General Agent ที่ทำได้ทุกอย่างในเทอร์มินัล ความสำเร็จในการใช้ Claude Code ขึ้นอยู่กับการ:
- Setup ที่ดี: CLAUDE.md ที่ครบถ้วน
- Building Blocks ที่เหมาะสม: Skills, Agents, Commands, Hooks
- Workflow ที่ชัดเจน: Explore → Plan → Code → Commit
- Specific Instructions: บอกชัด ได้ผลดี
ลองนำ templates และ framework ที่ให้ไปปรับใช้กับ project ของคุณ แล้วคุณจะเห็นว่า productivity พุ่งขึ้นแน่นอน!
มีคำถามหรือต้องการแชร์ประสบการณ์? Comment ได้เลยครับ!